Razorpay Integration in React + Node.js
Payments look simple from the outside. Show a button, collect money, unlock the feature.
I wired up Razorpay into a subscription-based React + Node.js app recently and spent more time than I’d like to admit on things that aren’t obvious from the docs alone - signature verification, webhook edge cases, the difference between Orders and Subscriptions. Writing this down mostly so I have a reference, but hopefully it saves someone else the same debugging sessions.
Before You Write Any Code - Understand the Split
The most important thing to get right isn’t the code, it’s knowing which side does what.
Here’s the short version in plain English:
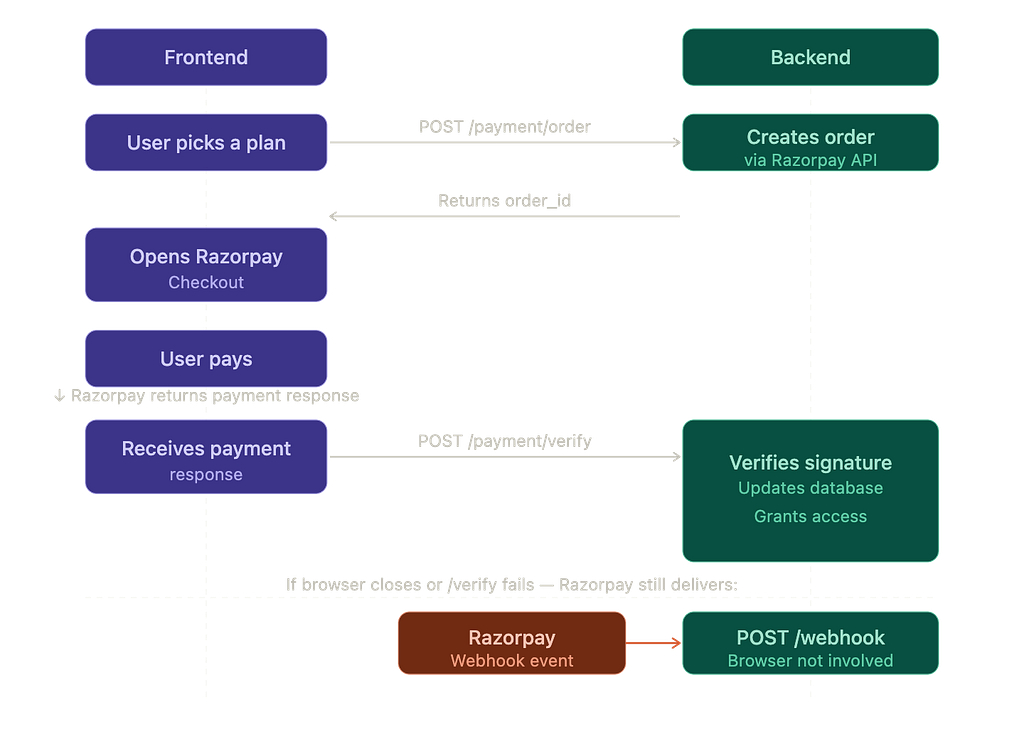
- Frontend asks backend to create an order → backend returns order_id
- Frontend opens Checkout → user pays → frontend sends payment response to backend
- Backend verifies signature → updates DB → grants access
- Razorpay also fires webhooks directly to the backend - no frontend involved
The frontend’s only job is to open Checkout and hand off the payment response. Everything that actually matters - creating orders, verifying signatures, updating your database, handling webhooks - happens on the backend.
If you mix these up, you either have a security hole or a broken integration. Keep this split in mind as you read the rest.
Environment Variables
Start here. Two .env files, one for each side.
Backend .env
RAZORPAY_API_KEY=rzp_test_xxxxxx
RAZORPAY_SECRET=xxxxxxxxxxxx
RAZORPAY_WEBHOOK_SECRET=your_webhook_secret
RAZORPAY_PLAN_ID_199=plan_xxxxxx
Frontend .env
VITE_RAZORPAY_API_KEY=rzp_test_xxxxxx
The frontend only gets the public key ID. RAZORPAY_SECRET and RAZORPAY_WEBHOOK_SECRET never leave the server - not in API responses, not in logs, not anywhere.
BACKEND
Step 1 - Install the Razorpay SDK
npm install razorpay
Step 2 - Initialize the SDK
Do this once, in a file your routes can import from.
import Razorpay from "razorpay";
const razorpay = new Razorpay({
  key_id: process.env.RAZORPAY_API_KEY,
  key_secret: process.env.RAZORPAY_SECRET,
});
Step 3 - Create Your Payment Routes
These routes handle order creation, verification, and subscription creation. Protect all of them with your auth middleware - a user shouldn’t be able to hit these without a valid session.
// payment.routes.js
router.post("/order", createOrderController);       // one-time payment
router.post("/plan", createPlanController);         // recurring subscription
router.post("/verify", verifyPaymentController);    // verify after checkout
// in your main app file
app.use("/payment", AuthMiddleware, paymentRoutes);
Step 4 - Create a One-Time Order
For one-time payments, your frontend needs an order_id from Razorpay before it can open Checkout. This endpoint creates it.
const createOrderController = async (req, res) => {
  const { subscription } = req.body; // e.g. "QUESTION"
  const amount = 49; // get this from your own constants, not from req.body

  // Store a PENDING record in your DB before touching Razorpay

  await storePaymentRecord({ user_id: req.user, plan: subscription, status: "PENDING" });

  // Create the order on Razorpay
  const order = await razorpay.orders.create({
    amount: amount * 100, // ₹49 → 4900 paise. Don't forget this.
    currency: "INR",
    receipt: `receipt_${Date.now()}`,
    payment_capture: 1,
  });

  // Update the DB record with the order_id Razorpay just gave us
  await updatePaymentRecord({ order_id: order.id });return res.status(201).json({ order_id: order.id, amount: order.amount });
};
Two things to note here. First, the amount goes in paise - ₹49 becomes 4900. Forget this, and your ₹499 plan charges ₹4.99. Second, create the DB record before calling Razorpay, with a PENDING status. This gives you a local paper trail even if something goes wrong mid-flow.
Step 5 - Create a Subscription (for Recurring Plans)
For recurring billing, use Razorpay Subscriptions instead of Orders. You’ll need to create a Plan in your Razorpay dashboard first and copy the plan ID into your .env.
const createPlanController = async (req, res) => {
  // Check your DB — don't create a new subscription if one is already active
  const isAlreadySubscribed = await checkActiveSubscription(req.user);

  if (isAlreadySubscribed) {
    return res.status(400).json({ message: "Already subscribed" });
  }

  const subscription = await razorpay.subscriptions.create({
    plan_id: process.env.RAZORPAY_PLAN_ID_199,
    total_count: 100,
    quantity: 1,
    customer_notify: 1,
    notes: { user_id: req.user },
  });

  return res.status(201).json({ subscription_id: subscription.id });
};
The response gives you a subscription_id. The frontend uses this instead of order_id when opening Checkout.
Step 6 - Verify the Payment Signature
This is the most important backend step. After a user pays, Razorpay sends three values to your frontend. Your frontend forwards them here, and your backend verifies they’re genuine.
const verifyPaymentController = async (req, res) => {
  const { order_id, payment_id, signature } = req.body;
  // Generate your own signature and compare
  const generated_signature = crypto
    .createHmac("sha256", process.env.RAZORPAY_SECRET)
    .update(order_id + "|" + payment_id)
    .digest("hex");if (generated_signature !== signature) {

    // Signatures don't match - payment response was tampered with

    // Mark payment as FAILED in your DB
    await markPaymentFailed({ order_id });

    return res.status(400).json({ message: "Payment verification failed" });
  }

  // Signatures match - mark as confirmed and activate access in your DB
  await markPaymentConfirmed({ order_id, payment_id });
  await activateUserAccess({ user_id: req.user });return res.status(200).json({ success: true });
};
Do not skip this. Someone can open your browser dev tools, intercept the checkout response, and send fake values to this endpoint. The signature check is what catches that. Razorpay marks it as mandatory for exactly this reason.
FRONTEND
Step 1 - Install the React Wrapper
npm install react-razorpay
This package handles loading the Razorpay Checkout script and gives you a Razorpay constructor to work with.
Step 2 - Build the Payment Hook
All your payment logic lives here. The component just calls pay(planName) and this hook handles the rest.
// usePayment.js
import { useRazorpay } from "react-razorpay";
import axios from "axios";export const usePayment = ({ user, session }) => {

  const { Razorpay } = useRazorpay();
  const [isProcessing, setIsProcessing] = useState(false);
  const pay = async (subscription) => {
    setIsProcessing(true);

    // Step 1: Ask backend to create the order or subscription
    const isRecurring = subscription === "PRO";
    const endpoint = isRecurring ? "/payment/plan" : "/payment/order";
    const { data: orderData } = await axios.post(
      `${import.meta.env.VITE_BACKEND_URL}${endpoint}`,
      { subscription },
      { headers: { Authorization: `Bearer ${session.access_token}` } }
    );

    // Step 2: Configure Checkout
    const options = {
      key: import.meta.env.VITE_RAZORPAY_API_KEY,
      currency: "INR",
      name: "Your App Name",
      prefill: {
        name: user.user_metadata?.full_name || "",
        email: user.email,
      },

      handler: async (response) => {

        // Step 3: After payment, send response to backend for verification

        // Note: for subscriptions, Razorpay handles verification via webhooks
        if (!isRecurring) {
          await axios.post(
            `${import.meta.env.VITE_BACKEND_URL}/payment/verify`,
            {
              order_id: response.razorpay_order_id,
              payment_id: response.razorpay_payment_id,
              signature: response.razorpay_signature,
            },
            { headers: { Authorization: `Bearer ${session.access_token}` } }
          );
        }
        setIsProcessing(false);
      },
      modal: {
        ondismiss: () => setIsProcessing(false),
      },
    };

    // Step 4: Attach the right ID — this is different for orders vs subscriptions
    if (isRecurring) {
      options.subscription_id = orderData.subscription_id; // recurring
    } else {
      options.order_id = orderData.order_id;               // one-time
      options.amount = orderData.amount;
    }

     // Step 5: Open Checkout
    const rzp = new Razorpay(options);
    rzp.open();
    setIsProcessing(false);
  };

  return { pay, isProcessing };
};
Step 3 - Use It in Your Component
// PricingModal.jsx
const PricingModal = ({ user, session }) => {
  const { pay, isProcessing } = usePayment({ user, session });  return (
    <div>
      <button onClick={() => pay("PRO")} disabled={isProcessing}>
        {isProcessing ? "Processing..." : "Subscribe — ₹199/mo"}
      </button>
    <button onClick={() => pay("QUESTION")} disabled={isProcessing}>
        {isProcessing ? "Processing..." : "Buy Question Pack — ₹49"}
      </button>
    </div>
  );
};
The component itself knows nothing about Razorpay. It just calls pay() with a plan name.
BACKEND (continued)
Step 7 - Set Up Webhooks
This is where a lot of integrations are incomplete. Even for one-time payments, webhooks matter. If a user pays and then closes the browser before your frontend can call /payment/verify, that verification never happens. The webhook is what catches it and updates their access anyway.
For subscriptions it’s even more critical - renewals, cancellations, and failed charges all come through webhooks, not the frontend.
Register your webhook URL in the Razorpay Dashboard under Settings → Webhooks. Your endpoint needs to be publicly accessible.
// In your main app file — order matters here
app.use("/webhook", express.raw({ type: "*/*" }), webhookRouter);
app.use(express.json()); // This must come AFTER the webhook route
Why raw body? Razorpay’s signature validation runs on the exact bytes of the request. If Express parses the JSON first, the body changes and your validation will always fail.
// webhook.controller.js
const paymentWebhookController = async (req, res) => {
  // Verify the webhook is actually from Razorpay
  const signature = req.headers["x-razorpay-signature"];
  const rawBody = req.body.toString("utf8");

const isValid = Razorpay.validateWebhookSignature(
    rawBody,
    signature,
    process.env.RAZORPAY_WEBHOOK_SECRET
  );

if (!isValid) return res.status(400).send("Invalid signature");

// Check for duplicate events — Razorpay can send the same event more than once
  const eventId = req.headers["x-razorpay-event-id"];
  const alreadyProcessed = await hasWebhookBeenProcessed(eventId); // check your DB

  if (alreadyProcessed) return res.status(200).send("Already processed");

  // Store the event ID so we don't process it twice
  await storeWebhookEventId(eventId);

  const { event, payload } = JSON.parse(rawBody);
  switch (event) {

    case "payment.authorized":
      // One-time payment confirmed
      await grantAccess(payload.payment.entity);
      break;

    case "subscription.charged":
      // Recurring payment went through
      await activateSubscription(payload.subscription.entity);
      break;

    case "subscription.cancelled":
      // User cancelled — revoke access at period end
      await handleCancellation(payload.subscription.entity);
      break;
  }

  return res.status(200).send("OK");
};
⚠️ About this webhook setup
This works fine for a college project or an early-stage startup. The limitation is that your Express handler processes each webhook synchronously - if your database is slow or you get a traffic spike, timeouts happen and Razorpay retries, which can cause duplicate processing headaches.
Production systems at scale decouple this: the webhook endpoint just drops the event into a queue (BullMQ, SQS, RabbitMQ) and immediately returns 200 OK. A separate worker processes it. If you're just starting out, the direct approach above is fine. Just know this is the first thing you'd change once traffic picks up.
Database: Two Tables, Not One
Keep payment attempts and active access in separate tables.
userPaymentDetails -every attempt, successful or not
user_id | plan | order_id | payment_id | status
                                         PENDING / CONFIRM / FAILED
userSubscriptionDetails -what the user actually has right now
user_id | subscription_type | status | end_date
                              ACTIVE / EXPIRED / CANCELLED
A confirmed payment is not the same thing as active access. Keeping them separate makes it much easier to debug edge cases and handle things like refunds or expired subscriptions later.
Mistakes Worth Avoiding
Granting access from the frontend handler -the handler runs in the browser. It can be faked. Only grant access after backend verification.
Creating the order on the frontend - the frontend doesn’t know the real price. Always create orders server-side.
Using subscription_id where order_id is expected - one-time payments use order_id, recurring use subscription_id. They go in different fields in the checkout config.
Not handling subscription webhooks - Miss webhooks and your subscription users will have issues when renewal comes around.
Parsing webhook body before verification - already covered above, but it’s a common enough mistake to repeat: raw body first, JSON parsing after.
Before Going Live
- Orders and subscriptions created server-side only
- RAZORPAY_SECRET never sent to frontend
- Signature verified on backend before granting access
- Webhook route receives raw body before JSON middleware
- Webhook signatures validated with RAZORPAY_WEBHOOK_SECRET
- Duplicate webhook events handled via x-razorpay-event-id
- Amount and plan defined on backend, not taken from request body